Lifecycle hooks of Angular Component
The article Building Block of Angular explains what a Component is in AngularJS and why we need those. Now, let us understand more about the component lifecycle hook of Angular.
What are Lifecycle Hooks in Angular?
In the dynamic world of web applications, components are not static entities. They undergo a life cycle — from their creation, through updates, and eventually to their destruction. To provide developers with a granular level of control throughout this life cycle, Angular introduces the concept of ‘Life Cycle Hooks’. These are specific milestones or events in the journey of a component.
Life Cycle Hooks are essentially callback methods that Angular invokes at specific stages. By tapping into these hooks, developers can execute custom code at crucial times in a component’s existence, ensuring optimal performance, timely updates, and effective resource cleanup.
Imagine constructing a building. Before laying the foundation, there’s a need for groundwork. Once the building is up, it might need occasional maintenance. And when the building is no longer required, it must be safely demolished. Similarly, Angular components have phases of initialization, update, and teardown. Lifecycle Hooks offer tools for each of these phases.
The Key Life Cycle Hooks in Angular
The following are the Key lifecycle hooks in Angular:
- ngOnChanges: Called before “ngOnInit” and whenever one or more data-bound input properties change.
- ngOnInit: Executed after the default change detector has checked the directive’s data-bound properties for the first time.
- ngDoCheck: Custom change detection can be executed here. It’s called during every change detection run.
- ngAfterContentInit: Called once the content (ng-content) has been projected into the component.
- ngAfterContentChecked: Invoked after every check of component content.
- ngAfterViewInit: Executed once the component’s views and child views have been initialized.
- ngAfterViewChecked: Called after every check of the component’s views and child views.
- ngOnDestroy: This hook is vital for cleanup. It’s executed just before Angular destroys the component. Useful for unsubscribing observables or detaching event handlers.
Understanding and utilizing these hooks is key to harnessing the true power of Angular. Whether you’re optimizing performance by controlling change detection or managing resources to prevent memory leaks, Life Cycle Hooks provide the essential touchpoints to shape the behavior and efficiency of components.
Now, look at the above key lifecycle hooks and Angular code’s syntax explaining the component lifecycle in detail as follows:
Stages of the Life Cycle of Angular Component
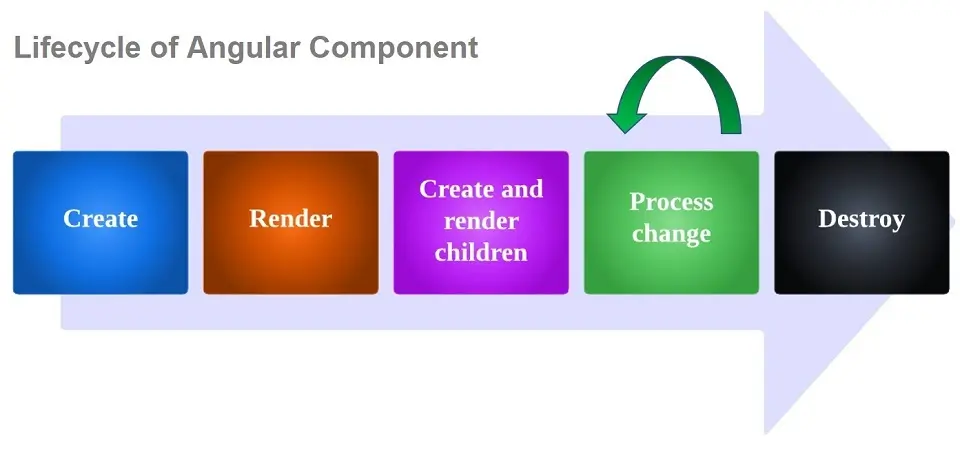
Angular itself manages a component lifecycle. The component life cycle comprises the following stages:
- Create
- Render
- Create and render children
- Process changes
- Destroy
Please refer to the diagram shown below:
Let us explain with an example of the earlier versions of angularJS to see how we can take advantage of the component’s life cycle.
If you might remember, in AngularJS, we use the “ngCloak” directive to hide {{}} interpolation before data renders. But now, from Angular v2 onwards, we have a lifecycle where we can manage it much more easily.
Now, let us understand the component life cycle in detail. But before that, let’s talk about the constructors in the component, as it is an essential part before diving into the life cycle.
Angular Component Constructor
Every component has a constructor in Angular. Refer to the example of the code shown below:
import { Component } from '@angular/core'
import { TextService } from './service/TextService'

@Component({
selector: 'my-products',
templateURL: 'app/products/product-list.component.html'
})

export class ProductListComponent {
 text: string;
 constructor (private text: TextService) {
  this.text = TextService.getText();
 }
}
Please note that the component’s constructor is called before any other component’s lifecycle hook. The constructor is also placed to inject dependency if our component has any.
For example, Our “ProductListComponent” is dependent on “TextService”. So, we must import and inject a service into the constructor. This is how dependency injection works in Angular 2.x.
Now we know about constructors, so let’s move forward and understand about component lifecycle.
The component has four stages. These are:
- “ngOnInit”
- “ngOnChanges”
- “ngOnDestroy”
- “ngDoCheck”
Each interface has a single hook method whose name is the interface name with the prefix ‘ng’. So, for example, the hook method of “OnInit” interface is “ngOnInit()”.
Let’s see each stage in detail.
ngOnInit
Calling “ngOnInit” is the first stage. “ngOnInit” is the Angular’s lifecycle hook that gets called and executed once the component is initialized. This hook is only called once. Refer to the code below to see how exactly hooks are implemented.
import { Component } from '@angular/core'
import { TextService } from './service/TextService'
import { OnInit } from '@angular/core'

@Component({
selector: 'my-products',
templateURL: 'app/products/product-list.component.html'
})

export class ProductListComponent implements OnInit{
 text: string;
 constructor (private text: TextService) {
  this.text = TextService.getText();
 }
ngOnInit() {
 console.log('Component Initialized');
}
}
As you can see in the above code, we first need to implement an interface, OnInit, in the above case. Then, we have a function ‘ngOnInit(),’ which will execute after the initialization of our component.
Also, note that ngOnInit is a better place to initialize components than the constructor. This is because calling ‘ngOnInit’ is after the initialization of all input properties.
ngOnChanges
“ngOnChanges” is a hook that is invoked whenever there is a change in input properties. The following code in Angular shows the use of “ngOnChanges” hook of Angular:
import { Component } from '@angular/core'
import { TextService } from './service/TextService'
import { OnChanges } from '@angular/core'

@Component({
selector: 'my-products',
templateURL: 'app/products/product-list.component.html'
})

export class ProductListComponent implements OnChanges{
 text: string;
 @Input() name: string;
 constructor (private text: TextService) {
  this.text = TextService.getText();
 }
 ngOnChanges( changes: productChanges) {
  if(changes) {
   this.text = 'Value changed'
  }
 }
}
ngOnDestroy
ngOnDestroy is a hook just before Angular destroys the component. This is the best place to do all clean-up activities, like detaching the event handler, to avoid memory leakage. Let’s have the following code of Angular to see the use of “ngOnDestroy” hook of Angular:
import { Component } from '@angular/core'
import { TextService } from './service/TextService'
import { OnInit, OnDestroy } from '@angular/core'

@Component({
selector: 'my-products',
templateURL: 'app/products/product-list.component.html'
})

export class ProductListComponent implements OnInit, OnDestroy {
 text: string;

 constructor (private text: TextService) {
  this.text = TextService.getText();
 }

 ngOnInit() {
  console.log('Component Initialized');
 }

 ngOnDestroy() {
  console.log('Component is destroyed');
 }
}
ngDoCheck
“ngDoCheck” is invoked when “OnChanges”, which we discussed earlier in this article, is invoked. Angular provides this to write our detection algorithm. We write change detections that angular doesn’t detect on its own.
Please note that the implementation of “ngOnChanges” and “ngDoCheck” should be simultaneously in a component.
Below are the children hooks of ‘ngDoCheck,’ which are only specific to components. Refer to this link to learn more about the following hooks.
- ngAfterContentInit
- ngAfterContentChecked
- ngAfterViewInit
- ngAfterViewChecked
Summary
Using the component life cycle of Angular, we can easily change our component behavior on initializing, updating, and destroying. And based on usability in the code, we will mostly use “ngOnInit” because it is a more preferred choice than the constructor, followed by “ngOnChange” and “ngOnDestroy”. We will need other lifecycle hooks of Angular for advanced operations besides these three.

Tavish lives in Hyderabad, India, and works as a result-oriented data scientist specializing in improving the major key performance business indicators.
He understands how data can be used for business excellence and is a focused learner who enjoys sharing knowledge.