Guide to Lifecycle of Vue in VUE.js
Vue.js is a JavaScript library that helps you build web applications using the MVVM (Model-View-ViewModel) architectural pattern. Evan You, an ex-Googler, developed the project. It is a strong open-source project with high usage popularity and GitHub stars and forks.
Why Use VUE.js?
As we know, there are many frameworks on the market, and choosing the proper framework for the project can be challenging. One reason to use VUE.js is that it is fast because of virtual DOM.
Upon comparing the performance of VUE.js, Angular, and React.js on multiple factors, such as the boot process performing (CREATE, READ, UPDATE, and DELETE) operations, it is found that overall, VUE.js has performed better on numerous performance matrices. Especially, Vue comes out better because of its simplicity, easy learning curve, and high performance. However, please note that Angular and React.js have their own merits.
What is Virtual DOM?
DOM stands for “Document Object Model.” As we know, HTML DOM is always tree-structured, which is good because we can traverse trees easily. Right?
But unfortunately, easily doesn’t mean quickly. We have thousands of div objects in DOM with modern apps, which is hard to manage and update. Moreover, updating a DOM is an expensive operation.
To avoid the above problem, Virtual DOM comes into action.
With Virtual DOM, we can easily manage and update our DOM. Virtual DOM is an HTML DOM abstraction that selectively renders nodes’ subtrees based on state changes. It does the least amount of DOM manipulation possible to keep your components up to date.
To understand virtual DOM even better, we can think of virtual DOM as we create a lightweight copy of our DOM, which we can change and then save to our real DOM. As simple as it sounds.
To summarize, the Virtual DOM is a technique that avoids direct manipulation with DOM and works with lightweight JavaScript objects that create our DOM.
Understanding the Lifecycle of Vue
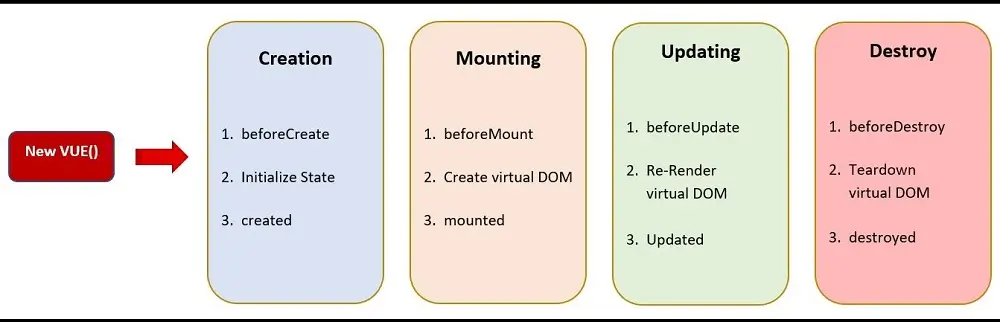
Let’s look at how the “Vue” is rendered on a page using VUE.js. The diagram below will help us understand how components are created, added to DOM, updated, and finally destroyed.

As shown in the image above, the component can go through four stages during its Lifecycle. These are:
- Creation
- Mounting
- Updating
- Destroy
OK! Now, let’s have a detailed look at what precisely the stages mentioned above mean.
Creation
This is the first step that runs in our component. This state allows us to perform actions before adding components in the DOM. This state is further divided into three states:
- Before Create: This is the state where data and events have not been created.
- Initialize State: This is the state where data and events have been initialized and are ready to be created.
- Created: This is the state where data and events are initialized but not mounted to DOM.
Once the data and events are initialized, they can be compiled as a template in the mounting state.
Mounting
The “Mounting” state allows us to access components immediately before and after the first render. Virtual DOM is created and mounted to the DOM tree in this state. The state is further divided into three states:
- Before Mount: This state is right before template rendering happens. Mostly, you won’t be using this state while building the application, but knowing that such a state exists is always good.
- Create Virtual DOM: This is a state where virtual DOM is created and is ready to be mounted.
- Mounted: This is a state where virtual DOM is mounted to the DOM tree, and HTML is ready to render.
Once the virtual DOM is mounted, it is in a state where it listens for any other changes and is ready to re-render DOM.
Updating
The “Updating” is a state where any updates happen and which causes DOM to re-render.
The state is further divided into three steps:
- Before Update: This state runs once our data is updated and is ready to re-render.
- Re-Render Virtual DOM: This is a state where the DOM is re-rendered with the updated changes.
- Updated: This is a state where an updated virtual DOM is mounted to the DOM tree.
Destroy
If the requirement is to destroy the DOM and clean up the DOM at any point, the “Destroy” state will come into action. This state is also further divided into three states:
- Before Destroy: This is a state where we clean up events and data before destroying them.
- Teardown virtual DOM: This is a state where the virtual DOM is torn down and is ready to mount to the DOM tree.
- Destroyed: This is a state where the component is destroyed from the DOM tree, and nothing is left.
Understanding the lifecycle of Vue in VUE.js will allow you to write the code in the best-fit stage to fulfill the business requirements and have a seamless running application.

Tavish lives in Hyderabad, India, and works as a result-oriented data scientist specializing in improving the major key performance business indicators.
He understands how data can be used for business excellence and is a focused learner who enjoys sharing knowledge.